RV Roof Leaks in the Pacific Northwest: Warning Signs You Shouldn’t Ignore

Owning an RV in Washington means having some of the best camping destinations in the country practically in your backyard. It also means dealing with something Pacific Northwest RV owners know extremely well: rain and moisture.
Your RV is designed to handle the elements, but its roof, seams, vents, skylights, air conditioners, and exterior seals require regular attention. A tiny opening in deteriorated sealant can allow water into places you can't easily see—and by the time an obvious ceiling stain appears, moisture may have already traveled farther than expected.
That's why understanding the warning signs of RV roof leaks in the Pacific Northwest is so important.
Whether your travel trailer or fifth wheel spends the winter in storage or stays on the road throughout the year, early detection can help prevent a small maintenance issue from turning into extensive water damage.
Here are the warning signs Washington RV owners shouldn't ignore, where RV roof leaks commonly develop, and when it's time to have your RV inspected by the Tacoma RV Service Center.
Why RV Roof Leaks Are a Major Concern in the Pacific Northwest
Washington's climate can be particularly challenging for RV exteriors.
The issue isn't simply one heavy rainstorm. It's repeated exposure to moisture over weeks and months.
An RV parked outside may experience:
Frequent rainfall
Wind-driven rain
Morning condensation
Freezing and thawing
Falling branches and debris
Moss and organic buildup
Summer UV exposure
Temperature changes that affect sealants
Over time, exterior sealants can shrink, crack, separate, or deteriorate.
The roof itself may still look fine from the ground, but water doesn't need a large opening to cause problems. Moisture can enter through a tiny gap around a roof penetration and migrate through insulation, wall cavities, cabinetry, or flooring.
This makes preventative RV roof maintenance especially important for owners in Tacoma, Fife, Seattle, Olympia, Puyallup, and throughout Western Washington.
Your RV roof is only one part of preventative maintenance—use our summer RV maintenance checklist to inspect other essential systems before your next Washington camping trip.
1. Water Stains on Your RV Ceiling
One of the most recognizable signs of an RV roof leak is discoloration on the ceiling.
Look for:
Yellow or brown spots
Dark rings
Uneven discoloration
Streaking near walls
Stains around vents or skylights
Don't assume a small stain means a small problem.
Water can travel before becoming visible, which means the actual entry point may not be directly above the stain.
If you notice new discoloration, investigate it quickly.
Waiting to see whether it gets worse gives moisture additional time to reach insulation, wood, wall panels, and other materials.

2. Soft Spots in the Ceiling or Roof
A soft or spongy area deserves immediate attention.
Inside the RV, gently inspect suspicious ceiling areas for changes in firmness.
On the exterior, roof inspections should be performed carefully and only if the roof is designed to support foot traffic. Never assume every RV roof is walkable.
Soft areas can indicate that moisture has been present long enough to affect underlying materials.
At that point, simply applying new sealant over the roof may not address everything happening underneath.
A professional inspection can help determine the source and extent of the problem.

3. Bubbling, Wrinkling or Peeling Interior Material
Sometimes water damage doesn't initially appear as a traditional brown ceiling stain.
Instead, you may notice:
Wallpaper beginning to bubble
Vinyl ceiling material sagging
Wall panels changing shape
Interior trim separating
Surface materials peeling
Unusual wrinkles near ceiling corners
Changes like these can indicate moisture behind the finished surface.
Pay particular attention to areas around exterior walls, windows, roof vents, slide-outs, and corners.
If something that used to be flat suddenly isn't, don't ignore it.

4. A Musty or Damp Smell Inside the RV
Your eyes aren't always the first thing to detect a leak.
Sometimes it's your nose.
If your RV develops a persistent musty, damp, or earthy smell, moisture may be trapped somewhere inside.
This can be particularly noticeable when opening an RV after it's been closed for several weeks.
Not every musty odor means you have a roof leak—humidity, plumbing leaks, wet fabrics, and condensation can create similar smells—but unexplained odors deserve investigation.
If cleaning and ventilation don't resolve the smell, start looking for the source rather than simply masking it.
5. Cracked or Separating Roof Sealant
You don't need to wait for water inside the RV before identifying a potential problem.
One of the most important parts of an RV roof inspection is checking sealant.
Pay close attention around:
Roof vents
Plumbing vents
Skylights
Antennas
Solar panel mounts
Roof edges
Ladder mounts
Air-conditioning units
Other roof penetrations
Look for sealant that appears:
Cracked
Dried out
Split
Lifted
Separated
Missing
Pulled away from the adjoining surface
RV sealants don't last forever.
Movement while towing, temperature fluctuations, weather exposure, and UV radiation all contribute to deterioration.
Catching a compromised seal before water enters the RV is exactly why routine inspections matter.
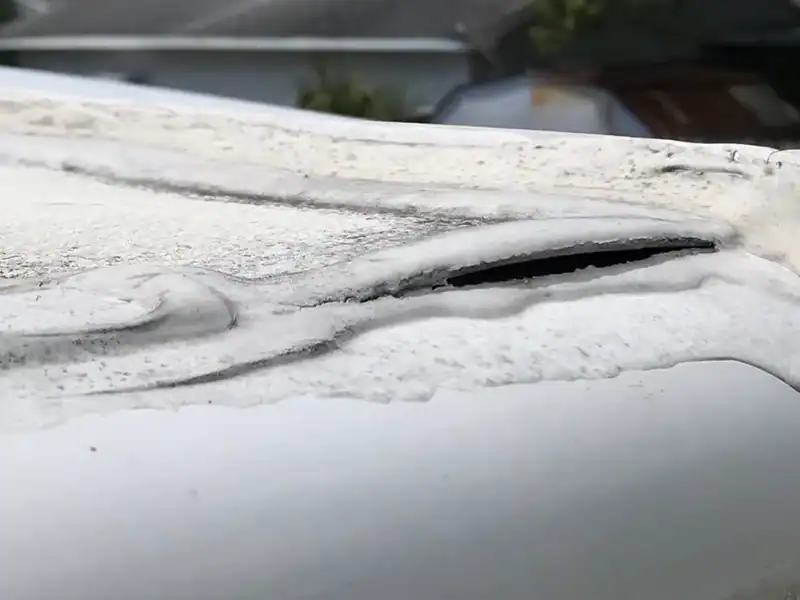
6. Water Around Roof Vents or Skylights
Roof vents and skylights are common areas to inspect because they require openings through the roof.
Any penetration through an RV roof creates seams that must remain properly sealed.
After heavy Washington rain, look inside around:
Bathroom vents
Kitchen vents
Bedroom vents
Skylights
Roof-mounted fans
Watch for droplets, damp trim, staining, or changes in the surrounding material.
Don't assume moisture around a vent is automatically condensation. Condensation is possible, especially during cold weather, but recurring moisture after rainfall should be investigated.

7. Damp Cabinets or Upper Storage Areas
Some roof leaks hide remarkably well.
Water may enter through the roof and travel behind the ceiling before eventually reaching an overhead cabinet.
Every so often, remove items from upper cabinets and check the surfaces behind them.
Look for:
Dampness
Staining
Swollen wood
Warped panels
Rusted hardware
Musty smells
Cabinets positioned against exterior walls deserve particular attention.
If you store your RV for extended periods, make these areas part of your inspection when reopening the trailer.
8. Wall Delamination or Exterior Bubbling
Water intrusion can eventually affect more than the roof.
On laminated RV walls, moisture intrusion can contribute to delamination, where layers of the wall begin separating.
From the exterior, this may look like:
Bubbles
Waves
Ripples
Bulges
Areas that no longer appear flat
Delamination can have multiple causes, so a visual change doesn't automatically prove the roof is leaking.
However, it absolutely deserves inspection.
The sooner the source of moisture is identified, the better.

9. Soft or Discolored Flooring
Here's where RV leaks can become especially deceptive.
You notice a soft floor.
Naturally, you start looking for a plumbing leak near the floor.
But water can sometimes enter much higher up and travel through the RV's structure before reaching the flooring.
Pay attention to:
Soft spots
Swelling
Discoloration
Loose flooring
Changes near exterior walls
Moisture beneath furniture
If flooring suddenly feels different underfoot, don't wait until it becomes dramatically worse.

10. Visible Water After Heavy Rain
This sounds obvious, but visible water inside an RV should never be considered "normal."
If you see water after a Washington rainstorm, even if it's only a few drops, determine where it's coming from.
Water may be entering through:
Roof seams
Windows
Doors
Slide-outs
Exterior lights
Storage compartments
Roof penetrations
The visible drip isn't necessarily directly below the actual leak.
That's one reason professional leak diagnosis can be valuable.
Where Do RV Roof Leaks Usually Start?
An RV roof contains more potential entry points than many owners realize.
Every vent, skylight, antenna, air-conditioning unit, solar mount, and seam creates an area that needs to remain watertight.
Some areas worth inspecting regularly include:
Roof Edges and Seams
Where materials meet, sealant becomes critical.
Roof Vents
Vent flanges and surrounding sealant can deteriorate with age and weather exposure.
Skylights
Large openings mean large sealed edges that should be checked routinely.
Air Conditioners
Roof-mounted air conditioners use seals and gaskets that can require attention.
Plumbing Vents
Small roof penetrations are easy to overlook.
Antennas and Accessories
Satellite equipment, antennas, solar installations, and other accessories create additional roof attachment points.
Front and Rear Roof Transitions
The places where the roof meets front and rear exterior panels deserve close inspection.
The important lesson is simple:
Don't inspect only the roof membrane. Inspect everything attached to it.
How Often Should You Inspect Your RV Roof in Washington?
There isn't one inspection schedule that fits every RV.
How your RV is stored, how frequently you travel, the age of the trailer, roof material, and exposure to weather all affect maintenance needs.
For Pacific Northwest owners, a smart approach is to inspect the roof several times throughout the year and before or after major seasonal changes.
Especially consider checking it:
After winter
Before summer travel
After severe windstorms
After driving beneath low branches
Before long-term storage
After extended outdoor storage
Before buying or selling a used RV
You should also follow the inspection and maintenance intervals specified by your RV and component manufacturers.
Spring is an ideal time to look for winter-related roof and seal damage—use our complete spring RV maintenance checklist before starting another Washington camping season.
Why You Shouldn't Just Cover a Crack With Sealant
Finding a crack and immediately applying sealant might seem like an easy solution.
Sometimes resealing is appropriate.
But you first need to understand why the seal failed and whether water has already entered the RV.
There are also different RV roof materials and different sealant products.
Using an incompatible product can create additional problems.
Before performing a DIY repair:
Identify your roof material.
Check the RV manufacturer's recommendations.
Determine whether the existing sealant can be repaired or should be removed.
Look for evidence of underlying moisture.
Use products specifically compatible with the surfaces involved.
When you're unsure, professional service is safer than experimenting on one of your RV's most important protective surfaces.
Pacific Northwest RV Storage and Roof Protection
How you store your RV can influence roof maintenance.
If your RV stays outdoors in Western Washington, periodically remove leaves, pine needles, branches, and other debris according to the manufacturer's cleaning instructions.
Debris can trap moisture against surfaces and make visual inspections more difficult.
Trees also introduce another issue: branches.
A branch scraping across the roof may damage sealant, vents, accessories, or the roof membrane without creating an immediately obvious interior leak.
After storms or suspected contact with branches, inspect the RV rather than assuming everything is fine.
If you use an RV cover, choose one designed for RV use and follow its installation instructions. Improper covers can rub against surfaces or trap moisture.
Buying a Used RV? Check for Water Damage
Roof condition should be a major consideration when shopping for a pre-owned RV.
A beautiful interior doesn't necessarily mean the trailer has never experienced moisture intrusion.
When evaluating a used RV, look for:
Ceiling stains
Soft flooring
Musty odors
Wall bubbling
Delamination
Interior panel changes
Excessive or messy exterior sealant
Signs of previous repairs
Ask questions about maintenance and inspection history.
A used RV can be an excellent value, but condition matters.
If you're comparing new and pre-owned RVs, water intrusion is only one factor to consider—our new vs. used RV buying guide covers additional questions Washington shoppers should ask before purchasing.
Don't Let a Roof Leak Ruin Your Next Washington RV Trip
Imagine packing for a weekend at Ocean Shores only to discover that the bedding in an overhead cabinet is damp.
Or arriving on the Olympic Peninsula during a rainy weekend and discovering water dripping from a roof vent.
Preventative inspections aren't the most exciting part of RV ownership.
But they're much better than discovering a leak halfway through your vacation.
Before a longer trip, walk around your RV and look for anything that has changed.
Your pre-trip inspection should include more than tires and propane.
Look up too.
Heading toward the coast? Washington's wet and salty coastal environment makes preparation especially important—check out our guide to RV camping at Ocean Shores, Long Beach, and the Pacific Coast.
Keep Your RV Ready With Tacoma RV Service Center
When you notice potential signs of an RV roof leak, waiting rarely makes the situation better.
A small sealing issue may be much easier to address before moisture reaches interior materials.
Tacoma RV Service Center can help Washington RV owners with inspections, maintenance, repairs, and other service needs to help keep their RVs ready for the road.
If you've noticed suspicious staining, deteriorating sealant, soft areas, or other signs of possible water intrusion, have the RV evaluated rather than hoping the next rainstorm doesn't make it worse.
Schedule your service online today and let Tacoma RV Service Center help you prepare for your next adventure.
8507 Pacific Hwy E
Tacoma, WA 98422
(253) 455-7837
Protect Your RV Before the Next Rainstorm
Rain is simply part of RV ownership in the Pacific Northwest.
Roof leaks don't have to be.
Regular inspections, proper maintenance, and catching small problems early can help protect your travel trailer or fifth wheel from costly water intrusion.
Remember the warning signs:
Ceiling stains
Soft areas
Peeling or bubbling materials
Musty odors
Cracked roof sealant
Moisture around vents and skylights
Damp cabinets
Exterior delamination
Soft flooring
Water appearing after rainfall
The most important rule?
Don't wait for water to start dripping from the ceiling before paying attention to your RV roof.
Your RV is an investment in future weekends, vacations, road trips, and memories. Keeping the roof maintained helps protect everything underneath it.
And here in Washington, where the next rainstorm is never too far away, that's maintenance worth prioritizing.